I have so much fun creating Pocket Letters and I'd like to share one of my techniques today. I used the new Christmas stamp sets from Rubber Dance together with the "Music Notes", the "Affirmations" set and the "Pines Fir Yew" set.
Die Bilder vom "Frosty Friends" und "Cozy Christmas" Set sind Zeichnungen von mir und dazu gibt es ein Giveaway auf meiner Facebookseite:
The images from the "Frosty Friends" and the "Cozy Christmas" set are my drawings and I have a giveaway on my facebook page where you can win your favourite of this sets:
Lasst uns anfangen. I verwendete Aquarellpaper der Größe 10.5" x 7.5" und prägte einige Zweige aus dem "Pine Fir Yew" set mit weißem Embossingpulver.
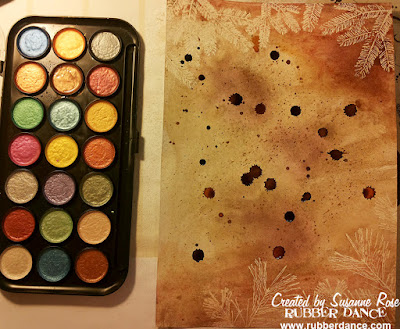
Let's start! I used a piece of watercolor cardstock that I cut to the size 10.5" by 7.5" and embossed some of the branches from the "Pine Fir Yew" set with white powder.
Der Hintergrund wurde nun mit dem Marabu Art Spray koloriert. Ich finde diese Sprühfarben toll, da sie nach dem Trocknen wasserfest sind.
I colored the background with the Marabu Art Spray. I really like these sprays, because they are waterproof when they are dry.
Mit Distress Ink "Walnut Stain" kamen einige Tropfen auf's Papier. Dazu drückte ich das Stempelkissen auf einen Acrylblock, gab etwas Wasser hinzu und ließ die Farbe auf den Hintergrund tropfen.
I used Distress Ink Walnut Stain to add some droplets. I pressed the the ink pad onto an acrylic block, added some water and let the drops fall down.
Schließlich kamen noch einige kleiner Spritzer hinzu und ein wenig Pearlescent Wasserfarbe für etwas Schimmer.
Finally I made some smaller splatters and used a bit of Pearlescent watercolors to make it shimmering.
Ich stempelte einge der Kreis vom "Round in Circles" set, einige Zapfen vom "Frosty Friends" set und die "Music Notes". Für die Kreise verwendete ich Distress Ink "Walnut Stain" und StazOn "Jet Black", wegen des Embossings, für die Zapfen und Musiknoten. Die Seite habe ich in 9 Karten geteilt bevor ich stempelte. Einfacher wäre es umgekehrt gewesen!
Mit Gesso und Distress Glitter "Clear Rock Candy" gab ich den Kanten der Karten einen frostigen Look.
I stamped some circles from the "Round in Circles" set, some of the cones from the "Frosty Friends" set and the "Music Notes". I used Distress Ink "Walnut Stain" for the Circles and StazOn "Jet Black" (because of the embossing) for the cones and the music notes. I cut my page into 9 pieces before I added those stamps. It would have been easier to stamp first and then cut!!!
I used gesso together with Distress Glitter "Clear Rock Candy" on some of the edges of every single card to get a frosty look.
Jetzt war es an der Zeit die Motive vorzubereiten. Coloriert habe ich mit Distress inks und goldenen Pearlescent Wasserfarben. Die Schleife und das Geschenk sind mit goldenem Pulver embossed.
Now it was time to prepare the images that I wanted to add to my pockets. I colored them with Distress Inks and with some of the golden Pearlescent watercolors. The Gift and the bow were embossed with gold powder.
Now it was time to prepare the images that I wanted to add to my pockets. I colored them with Distress Inks and with some of the golden Pearlescent watercolors. The Gift and the bow were embossed with gold powder.
Es kamen noch ein paar Verzierungen hinzu und ich konnte die Taschen füllen.
I added the embellishments and filled in the pockets:
Das Haus ist eine Stanze von Marianne Design. Das Doily ist von Cottage Cutz.
The house is a die from Marianne Design. The doily comes from Cottage Cutz.
Stamp sets from Rubber Dance:
Frosty Friends
Cozy Christmas
Music Notes
Pine Fir Yew
Round in Circles
Affirmations
You will get 15% discount on your next order in the Rubber Dance Online Store when you enter "susanne2015" during checkout.


Gorgeous, Susanne !
ReplyDeleteCorrie x
love the design and the colors used beautiful x
ReplyDeleteHiho. Vielen herzlichen Dank für diese tolle Anleitung. So ausführlich und verständlich. Und das Endergebnis ist wunderschön.
ReplyDeleteHiho. Vielen herzlichen Dank für diese tolle Anleitung. So ausführlich und verständlich. Und das Endergebnis ist wunderschön.
ReplyDeleteThis is SO beautiful. Who wouldn't love to receive this?
ReplyDelete