Showing posts with label DCWV. Show all posts

Saturday, January 26, 2019

Clean & Simple Card with the Cute Cow Stamp from Rubber Dance

Hi everyone!!!

I'd like to share a quick and easy card today with one of the brand new Rubber Dance cows. All new sets are 10% until February 3rd. So jump over to the store and have a look!

Hallo Ihr lieben!
Heute kann ich Euch eine schnelle und einfache Karte mit einer der süßen Kühe von Rubber Dance zeigen. Sie sind gestern ganz neu raus gekommen. Schaut am besten gleich mal auf den Rubber Dance Blog. Dort gibt es nämlich auch gleich ein paar gewerkelte Objekte :-) 
Die Stempel sind übrigens bis zum 3. Februar um 10% reduziert!

http://rubberdance.de/new


Thanks for stopping by today!
Danke für's rein schauen.
xx Susanne


Supplies:
Rubber Dance Stamps:
https://goo.gl/T8agQH


Others:
Distress Ink

Wednesday, October 24, 2018

My December Daily Traveler's Notbook - DIY Video Tutorial

Hi there!!!

It's time for a new video on my YouTube channel. I finished my December Daily Traveler's Notebook. Recently I started scrapbooking in Traveler's Journals instead of doing big layouts. This year I will do the same for our December Days.

Enjoy the video:


Thanks for stopping by today!
xx Susanne.

Friday, April 27, 2018

Tim Holtz inspired Greeting Card

Hi there!

It's time for my friday's video. Today I have a Tim Holtz inspired card for you. I used the new funky floral dies, the stacked deckle frame and Distress Oxide inks.

Enjoy watching the video:


Here are some close-ups:


Thank you for stopping by today!
xx Susanne.


Supplies:
STAMPlorations (20% discount at http://stamplorations.com with STAMPGIRLSUSANNE)
Birthday Word die

Crealies Banner die

All other dies are from Sizzix

Distress Oxides
Patterned Paper by DCWV

Thursday, March 22, 2018

Greeting Card with Paper Scraps and Pearl Powder

Hi everyone!

I am sharing a video tutorial today for the Technique Thursday post on the Rubber Dance Blog. I used Pearl Pigment Powders together with the Butterfly Trio Stamps from Rubber Dance.


xx Susanne

Supplies:
Rubber Dance:

Others:
Patterned Paper
White Embossing Powder
Black Cardstock
Doublesided Tape
Greeting die from STAMPlorations
VersaMark Ink
Pearl Powder Pigments (you can also use Perfect Pearls or even Eyeshadow)

Friday, December 15, 2017

How to make a Mini Art Journal from and Envelope - Video Tutorial

 Hi there!

I have some news for all the journal lovers of you. From this Friday on I will share a video about how to make and fill a mini journal every Friday during the next weeks. We will play until this journal is finished!
The ones of you, that are following my instagram page have already seen some sneak peeks. Today we start by making the journal from an gelli printed envelope. 


 My envelope measures 23cm by 16cm (9" x 6.25"). I hope you enjoy the video:


Here are some photos of the inside:


xx Susanne.

Thursday, October 19, 2017

Happy Halloween Card with Rubber Dance Stamps

Hi there!

Today I am sharing a greeting card with Rubber Dance stamps and papers form DCWV. Detail are on the Rubber Dance blog.


xx Susanne.

Wednesday, August 30, 2017

Hello Baby - Greeting Card with Rubber Dance

Hi there!

I have a quick and easy baby card tutorial for you on the Rubber Dance blog


You can save the shipping costs worldwide at 
rubberdance.com with the code:  
SRFreeShip 
(on orders over 15€)

xx Susanne.

Wednesday, May 3, 2017

Whale Love - Art Journal Page - Process Video

Hi everyone.

I have a new intiuitive art journal video up on my YouTube channel.


Enjoy the video:


Here are some close-ups:


Thanks for stopping by.
xx Susanne

All stamps are from Rubber Dance. Save the shipping costs over at rubberdance.com with the code "SRFreeShip".

Friday, March 24, 2017

STAMPlorations Spring Coffee Lovers Blog Hop

Hi everyone and welcome to the STAMPlorations Spring Coffee Lovers Blog Hop!
I'm sharing two projects today with some new Coffee themed products from STAMPlorations.com. Use "STAMPGIRLSUSANNE" to save 20% in the STAMPlorations web shop!

My first project is a greeting card. I used a background that was created with the ARTplorations "Oh my Stars" stencil together with Brushos. The lovely Copper-Blue patterned paper is from DCWV. I colored the "Framed Coffee Bags with a Donut" stamp with watercolor pencils.

The second project is an Artist Trading Card. I used the "Blooming Spring Coffee Basket" stamp as my main image and colored it also with watercolor pencils.

Have fun hopping along today!
xx Susanne.

I added my link to the Coffee Loving Cardmakers!

Supplies:
STAMPlorations:
Blooming Spring Coffee Basket
Framed Coffee Bags and a Donut
Artplorations:
Oh my Stars
Others:
Brusho Crystal Colours
Koh-I-Noor Watercolour pencils
DCWV Copper Blues

Monday, March 6, 2017

DCWV Stack-a-holic challenge

Hi everyone!

Today I'm sharing my card for the DCWV Stack-a-holic challenge. I used the Birds and Butterflies Stack. The cardbase is made with paper from the Cardstockstack. I really love the 6" x 6" embossed colored papers and the shimmer papers. They are perfect to add layers on top.
The Feather stamps are from the Rubber Dance Textured Feathers stamp set. I colored them with Distress Inks.
(BTW: You'll get free shipping with SRFreeShip in the Rubber Dance online shop)


xx Susanne.


Supplies:
Rubber Dance Textured Feathers 

Tuesday, February 28, 2017

Art Journal Page with Viva Las VegaStamps - Video Tutorial

Hi everyone.

I am sharing a video today over at the Viva Las VegaStamps! blog. I had a play in my art journal:


xx Susanne.

Challenges:
A vintage Journey
Crafting with Friends
Alphabet Challenge
Crafty Catz
Creative Fingers
Jo's Scrap Shack
Love To Create
Inkspirational

Supplies:
VLVS:
Melanthium Vulgare - https://vlvstamps.com/melanthium-vulg...
Dictionary Page - https://vlvstamps.com/dictionary-page...
Be Adorable - https://vlvstamps.com/be-adorable-1-3...
Blowing Dandelion - https://vlvstamps.com/blowing-dandeli...
DCWV:
DCWV: 12" x 12" White Embossed Cardstock Stack, 12" x 12" Jet Black Stack, 12" x 12" Hello Darlin' Stack 12" x 12" - DCWV
Others:
Brusho Crystal Colours: Sea Green, Purple, Prussian Blue
Prima Micro Beads: Splash, Copper, Blus
Art Anthology Stencil
Art Anthology Coloration Spray: Timeless, Sandcastl, Plush - http://artanthologyinc.com/
 

Thursday, February 2, 2017

Mixed Media Tag with Deco Art

Hello! I'd like to share another tag with DecoArt products today. I have also some step by step instructions for you:

Start by coloring the background with Fluid Acrylics and add Crackle Paste through the Alphabet Spaghetti Stencil. Let it dry.

Add a layer of Metallic Gold on top. Just use your fingers to spread the paint all over the crackle. Let it dry.

Add a layer of Antiquing Cream Carbon Black, let it dry and wipe it away with baby wipes until you like it.

I used an ornament stamp from Viva Las VegaStamps! for some more interest on my background.
Add die cuts from different patterned papers (I used DCWV Glitter Stack and Paper Plants). I used the Sizzix Wildflowers. My sentiment are homemade stickers.


Thank you for stopping by today!
xx Susanne

Supplies:
Deco Art Media:
Fluid Acrylics Cadmium Orange Hue
Fluid Acrylics Quinacridone Burnt Orange
Antiquing Cream Carbon Black
Crackle Paste
Andy Skinner Alphabet Spaghetti Stencil

DCWV:
DIY Project Stack Paper Plants
Glitter Cardstock Border Stack

Others:
Sizzix Tim Holtz Wildflowers
Viva Las VegaStamps!

Tuesday, January 31, 2017

Fishing Shaker Card with DCWV

Hi everyone.

I'd like to share the birthday card for my father in law's 70th anniversary. He goes fishing to Norway every year, so I decided to take this theme for his card.
I used papers from the DCWV Out in the Wild Paper Stack and the Foiled Cardstock Stack.


The main image is a stamp from Designs by Ryn. I embossed it with WOW! Colourblend Misty Sky and colored it with watercolour pencils and Brushos. My tiny die cuts, that are my shaker glitter are cut with a die from Marianne Design.
I used a Sizzix alphabet die and Distress Glitter Forest Moss for my "70".


xx Susanne.


Supplies:
DCWV 12" x 12" Out in the Wild Stack
DCWV 6" x 6" Foiled Cardstock Stack

Dies: Sizzix, Marianne Design, Noor! Design, Crealies, Rayher
Stamps: Designs by Ryn
Brushos
Stampendous Aged Hunter Embossing Enamel
WOW! Colourblend Misty Sky

Sunday, January 15, 2017

Challenge Reminder for Rubber Dance

Hello Crafty Friends!

There are two weeks left to join our January Colour Challenge. We picked a winter theme this time and we do love its glorious colours!

http://rubberdance.blogspot.de/2017/01/rubber-dance-stamp-challenge-january.html

I created a mixed media tag with a snowy theme. The background is created with Gelatos and molding paste. I used different background stamps for some more texture. My sentiment is a mix from the Winter Wonderland's "let it snow" and a free printable from MixedUpMag. The birdie is a die from Die-Namites. I covered it with red Stickles glitter.I used some corrugated cardboard from DCWV to create a fence for my bird.


Thanks for stopping by today,
xx Susanne.
http://www.rubberdance.com/

Rubber Dance Stamps:

Wednesday, January 11, 2017

Butterfly Tag Tutorial with STAMPlorations


Hi my dear mixed media friends.

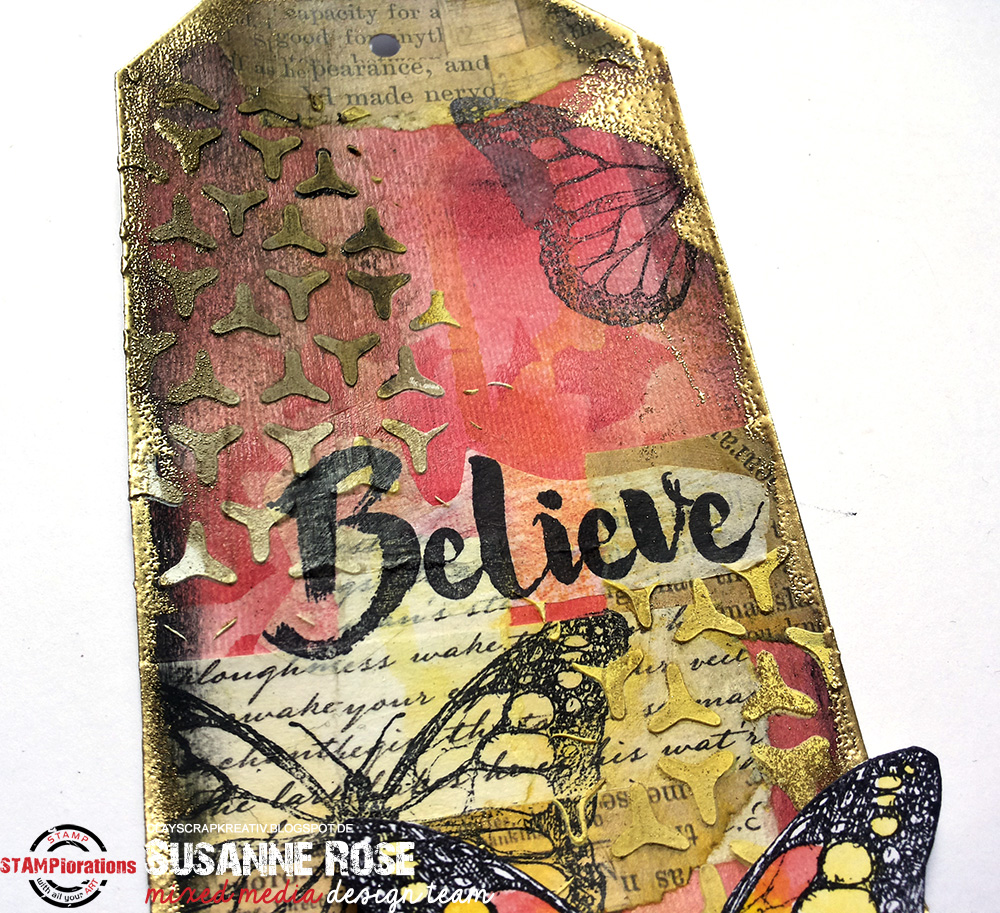
 I'd like to share a butterfly tag today. I LOVE creating tags because they are so versatile to use later. I prefer using them in my planner, on gifts or in my art journal.

Here are the step by step instructions:

1. I create a background using VersaMark ink through the "Daisy Dance" stencil and adding PanPastels. The color pigments with stick to the ink and you'll end up will this lovely pattern.

2. To seal the PanPastels I use my gelli plate together with some Gel Medium. Add a thin layer of Gel to the Plate and press the tag down.


3. Add some patterned paper scraps with Gel Medium.


4. Stamp the butterfly from the "Blossom like a Butterfly" set with waterproof black ink.


5. Add some shading with a watercolor crayon. I love to use Neocolor II crayons.


6. I use the "Lattice Y" stencil to add some texture with modeling paste.


7. Add some yellow with Distress Ink "Mustard Seed". I press the ink pad onto my craft mat and use water plus a brush to add it to my tag.


8. I used some tissue paper and stamp the "Believe" with waterproof black ink.
I cut it out and add it with Gel Medium.


 9. I use the chocolate Gelato to add some more shading and WOW! Metallic Gold Powder on the edges.

10. Finally I adhere a butterfly (it's colored with Distress Inks) on top.


Thank you for stopping by today,
Susanne.

Stencils from STAMPlorations:
Lattice Y
Daisy Dance

Stamps from ARTplorations:
Blossom like a Butterfly
Believe