Hallo alle zusammen.
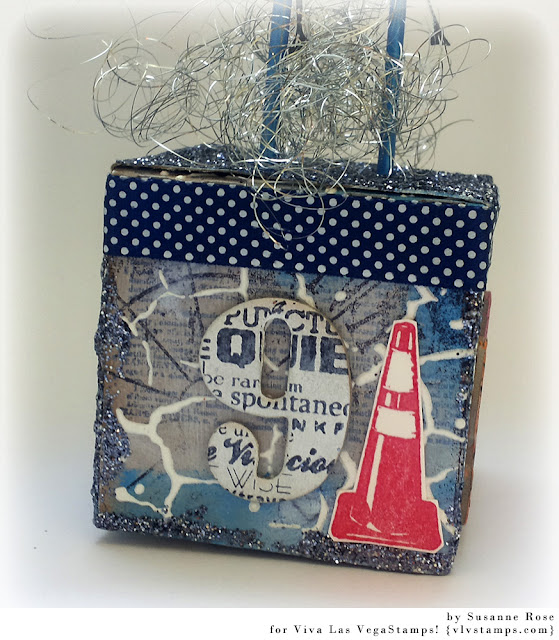
Heute möchte ich diesen Artist Trading Block teilen. Der Würfel und auch der Vogel sind mit der Silhouette Cameo geschnitten. Verziert hab ich die Würfelseiten mit Stanzteilen aus Goldfolie. Der Vogel wurde bestempelt und mit Metallflocken verziert. Die Ränder habe ich mit weißer Crackle Paste bestrichen.
Today I'd like to share this Artist Trading Block with you. The cube as well as the bird are cut with the Silhouette Cameo. I embellished the sides of the block with die cuts that I made from gold foil. The birdy is stamped and textured with Gilding Flakes. The edges are painted with Crackle Paste.
Die Goldfolie lässt sich super stanzen und auch prägen. Das macht sich bei der hübschen Ornament Stanze von Noor! Design besonder gut.
Gold foil is perfect to emboss the die cuts. That looks really beautiful on the Noor! Design Ornament.
Ich wünsche Euch eine schöne erste Adventswoche. Liebe Grüße, Susanne.
Schaut doch mal auf meinem Blog vorbei. Dort gibt es ein Advents-Giveaway.
I wish you some nice days. Hugs Susanne.
By the way. I'm doing a blog giveaway. Maybe you'd like to join.
Stamps from Rubber Dance (save 15% in the Rubber Dance online store using the code: "susanne2015"):
Music Notes
Challenges:
Fab'n'Funky Challenge
Creative Moments
Simon Says Stamp
Crafting by Designs
Material aus dem Cards und More Shop:
Monday, November 30, 2015
Saturday, November 28, 2015
Live Life Now
Hallo liebe Visible Image Freunde.
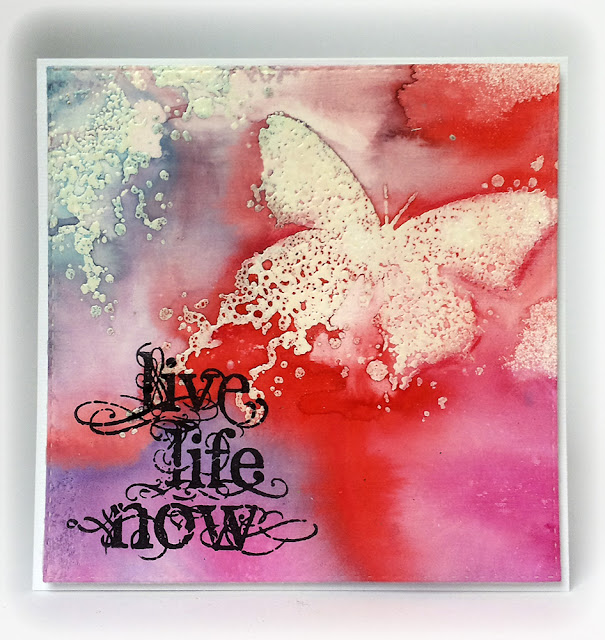
Heute möchte ich Euch ein Mixed Media Kärtchen zeigen, welches mit dem tollen Butterfly INKognito und dem Live Life Now Stempel von Visible Image gestaltet wurde.
Hi my dear Visible Image Friends!
I'd like to share a mixed media card today, which is created with the gorgeous Butterfly INKognito and the Live Life Now stamps from Visible Image.
Den Hintergrund habe ich mit Gesso grundiert. Nach dem Trocknen stempelte ich den Schmetterling mit VersaMark und embosste diesen mit transparentem Pulver. In der linken oberen Ecke stempelte ich ebenfalls einen Teil den Schmetterlings. Nun kam Farbe mit den den Marabu Art Sprays hinzu. Die Farben sind auf Acrylbasis. Nach dem Trocknen lassen sie sich von den geprägten Stempelabdrücken abwischen. Den Text stempelte ich mit StazOn.
I primed the background with white gesso first. After this was dry I embossed the butterfly stamp with clear powder. I also stamped part of the stamp in the left upper corner. I added colour with the Marabu Art Sprays. They are based on acrylics and can be removed from the embossed parts with a babywipe. The sentiment is stamped with StazOn.
Ich wünsche Euch noch einen schönen Samstag, Susanne.
I wish you a nice saturday, Susanne.
Stamps from Visible Image:
Butterfly INKognito
Live Life Now
Other supplies:
Marabu Art Sprays (Chili, Raspberry, Petrol)
StazOn Jet Black
Clear Embossing Powder
Gesso
Challenges:
Crafting from the Heart
Through the Craft Room Door
Crafty Your Passions
Love To Scrap!
Wednesday, November 25, 2015
Snowy Ornament
Hallo liebe Bastelfreunde. Weihnachten rückt immer näher, deshalb möchte ich Euch heute einen winterlichen Anhänger für den Die-Namites Dies Blog zeigen.
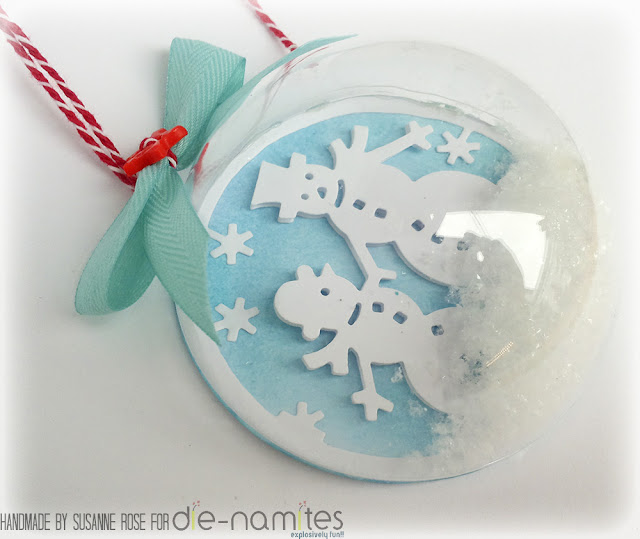
Hi my dear crafty friends! Christmas time is near, so I have a nice Christmas ornament to share today over at the Die-Namites Dies Blog.
Ich hab die "Snowglobe Scene" Stanzschablone verwendet.
I used the "Snowglobe Scene".
Ich hab einen 15% discount code für Euch für Euren nächsten Einkauf im Die-Namites Dies Online Shop. Gebt susanne15 in das Gutscheinfeld im Warenkorb ein. Der Versand ist übrigens ab 25$ weltweit frei.
I have a 15% discount code for you to use with your next order over at the Die-Namites Dies Online Store. Use susanne15 during the checkout process. By the way: you'll get free shipping on all orders over 25$ worldwide!!!
Den Hintergrund habe ich passend zur Acryl-Halbkugel zugeschnitten und mit Distress Ink "Tumbled Glass" koloriert. Anschließend klebte ich den oberen Teil der "Snowglobe Scene" direkt auf den Hintergrund. Die Schneemänner kamen dann noch einmal extra mit 3d Klebepads oben drauf. Bevor die Kugel am Hintergrund befestig wurde, kam noch ein Teelöffel Schnee hinzu. Kunstschnee natürlich! Damit der Hänger gerade hängt müsst Ihr ein paar Münzen auf die Rückseite kleben.
To create the ornament I cut a background circle with the same size as my acrylic ornament. I colored it with Distress Ink "Tumbled Glass". Then I adhered the top of the "Snowglobe Scene" to the back and a second layer with only the snowmen using 3d foam squares. Before I build everything together I added a teaspoon of snow. Fake snow of course ;-).
You need to add some coins to the backside of the ornament, so that it will hang straight.
Bis zum nächsten Mal und vergesst nicht den 15% discount code für Euren nächsten Einkauf im Die-Namites Dies Online Shop. Gebt susanne15 in das Gutscheinfeld im Warenkorb ein. Der Versand ist übrigens ab 25$ weltweit frei.
See you all soon and don't forget to use the 15% discount code with your next order over at the Die-Namites Dies Online Store. Use susanne15 during the checkout process. Order over 25$ ship free worldwide.
Products from Die-Namites Dies:
Snowglobe Scene
Other supplies:
Acrylic ornament
Distress Ink "Tumbled Glass"
Fake snow
Some Ribbon and coins.
Hi my dear crafty friends! Christmas time is near, so I have a nice Christmas ornament to share today over at the Die-Namites Dies Blog.
Ich hab die "Snowglobe Scene" Stanzschablone verwendet.
I used the "Snowglobe Scene".
Snowglobe Scene |
I have a 15% discount code for you to use with your next order over at the Die-Namites Dies Online Store. Use susanne15 during the checkout process. By the way: you'll get free shipping on all orders over 25$ worldwide!!!
Den Hintergrund habe ich passend zur Acryl-Halbkugel zugeschnitten und mit Distress Ink "Tumbled Glass" koloriert. Anschließend klebte ich den oberen Teil der "Snowglobe Scene" direkt auf den Hintergrund. Die Schneemänner kamen dann noch einmal extra mit 3d Klebepads oben drauf. Bevor die Kugel am Hintergrund befestig wurde, kam noch ein Teelöffel Schnee hinzu. Kunstschnee natürlich! Damit der Hänger gerade hängt müsst Ihr ein paar Münzen auf die Rückseite kleben.
To create the ornament I cut a background circle with the same size as my acrylic ornament. I colored it with Distress Ink "Tumbled Glass". Then I adhered the top of the "Snowglobe Scene" to the back and a second layer with only the snowmen using 3d foam squares. Before I build everything together I added a teaspoon of snow. Fake snow of course ;-).
You need to add some coins to the backside of the ornament, so that it will hang straight.
Bis zum nächsten Mal und vergesst nicht den 15% discount code für Euren nächsten Einkauf im Die-Namites Dies Online Shop. Gebt susanne15 in das Gutscheinfeld im Warenkorb ein. Der Versand ist übrigens ab 25$ weltweit frei.
See you all soon and don't forget to use the 15% discount code with your next order over at the Die-Namites Dies Online Store. Use susanne15 during the checkout process. Order over 25$ ship free worldwide.
Products from Die-Namites Dies:
Snowglobe Scene
Other supplies:
Acrylic ornament
Distress Ink "Tumbled Glass"
Fake snow
Some Ribbon and coins.
We would love to have you as friend, follower and subscriber to the following social media avenues: Facebook Fans, Pinterest and Instagram.
Tuesday, November 24, 2015
Artist Trading Block - Tutorial
Heute habe ich ein Tutorial für diesen Artist Trading Block auf dem Viva Las VegaStamps! Blog für Euch. Den Würfel für den ATB habe ich mit der Silhouette Cameo geschnitten. Natürlich braucht Ihr dafür keine Schneidemaschine. Im Netz gibt es kostenlose Vorlagen dafür oder Ihr verwendet eine Stanzschablone.
I have a tutorial for this Artist Trading Block (ATB) for you on the Viva Las VegaStamps! Blog. I cut the base of the ATB with the Silhouette Cameo. Of course you don't need an e-cutter. You'll find free templates for a cube online or you can use a cutting die.
Und so geht's: Here are my instructions:
1. Step:
Stempelt den Dictionary Page Hintergrund auf den Rohling.
Stamp the Dictionary Page background randomly onto the cube blank.
2. Step:
Streicht eine dünne Schicht Gesso darüber.
Add a thin layer of gesso on top.
3. Step:
Mit dem Gelato (Cotton Candy) kommt etwas Farbe ins Spiel. Anstelle der Gelatos könnt Ihr auch andere wasserlösliche Kreiden verwenden. Der Vorteil der Gelatos ist halt, dass diese sich kinderleicht mit den Fingern verwischen lassen.
Use the Gelato (Cotton Candy) to add some color. Instead of the Gelatos you can also use other watercolor crayons. A plus of the Gelatos is, that you can blend them easily with your fingers.
4. Step:
Für etwas mehr Textur wird der Worn Clockface Stempel verwendet.
Add a second layer of texture with the Worn Clockface stamp.
5. Step:
Für etwas mehr Kontrast eignet sich der weiße Gelato hervorragend.
Take the white Gelato in this step to give the background some more contrast.
6. Step:
Jetzt ist es Zeit für etwas "echte" Struktur. Dafür verwende ich Strukturpaste zusammen mit einer Crackle Schablone.
Now it's time for some structure. I used modeling paste together with a crackle stencil.
7. Step:
Wenn alles getrocknet ist, kann der Würfel zusammen geklebt werden.
When the texture paste is dry you can build up the ATB base.
8. Step:
Der The Fish in Mini Skirt Stempel und der Fat Fish in Heels werden gestempelt und ausgeschnitten. Mit den Twinklings H20 kommt ein Schimmereffekt hinzu (ihr könnt jede andere Schimmerfarbe verwenden). An die Fische kommt ein Holzspieß mit Heißkleber dran. Den Spieß habe ich mit Viva Decor Inka Gold eingefärbt. Befor die Fische in den Würfel gesteckt werden, wird die Oberseite noch mit Gel Medium und Glitzer verschönert.
Stamp the The Fish in Mini Skirt and the Fat Fish in Heels and cut them out. Add some Twinklings H2O for a shimmery effect (alternatively you can use other shimmery colors). Adhere a wooden spear to the fishes with hot glue. I colored the spears with Viva Decor Inka Gold. Before you add the fishes to the block, cover the whole top with Gel Medium and glitter.
9. Step:
Glitzer kommt ebenso an alle Kanten. Zum Verzieren verwendete ich Kartonbuchstaben und Zahlen. Koloriert hab ich diese ebenfalls mit Viva Decor Inka Gold. Bestempelt wurden sie mit dem Be adorable Stempel. Noch ein paar mehr Akzente bringen der Pylon und One Way SmallStempel. Für etwas mehr Pepp kommt das silberne Engelshaar hinzu.
Add glitter to the edges as well. I used chipboard die cutted numbers and letters for the embellishing. The chipboard is painted with different colors of Viva Decor Inka Gold and stamped with the Be adorable stamp to add some texture. Some more embellishments are the Pylon and the One Way Small . Use some silver tinsel to finish it up.
Bis bald, Susanne.
See you soon and happy crafting, Susanne.
Stamps from Viva Las VegaStamps!:
Plate 918:
Worn Clockface
Be adorable
Plate 890:
Dictionary Page
Plate 1338:
The Fish in Mini Skirt
Fat Fish in Heels
Plate 927:
Pylon
One Way Small
Other supplies:
Gesso
Gel Medium
Modeling Paste
Gelatos: Cotton Candy, Coconut
Viva Decor Inka Gold: Orange, Violett, Silver, Pink, Blue
StazOn Jet Black
Prima Marketing Crackle Stencil
Memento Luxe: Sweet Plum, Love Letter
Twinklings H2Os: Summer Breze
Glitter
Silver Tinsel
Wooden Spears
Sunday, November 22, 2015
Blossom like a Butterfly
Hallo alle zusammen.
Es ist Stencil Sunday auf dem STAMPlorations Blog.Dazu habe ich ein Mixed Media Banner gewerkelt.
Hi everyone!
It's Stencil Sunday over at the STAMPlorations Blog and I'd like to share this mixed media banner today.
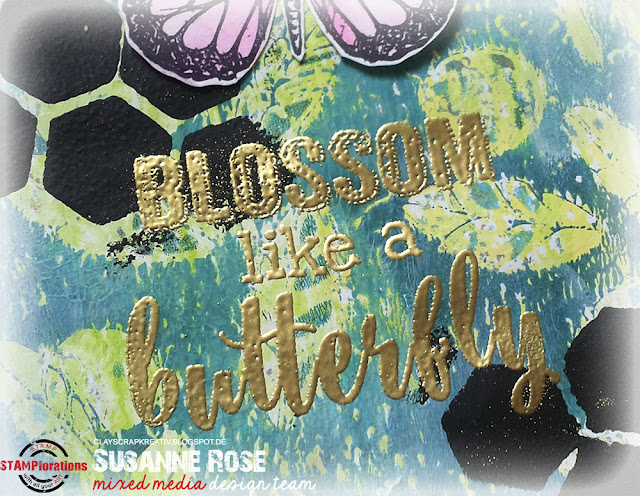
Das Banner ist aus dem DCWV DIY 6" x 8" Banner Project Stack. Es wurde von mir mit einer dünnen Schicht Gesso versehen. Das zweite Banner ist ein Gellidruck, der mit der neuen tollen Schablone "Leaf Bliss stencil" von ARTplorations gestaltet wurde. Etwas mehr Textur kam mit der "Honeycomb Delight" Schablone und schwarzem Gesso hinzu. Mein Thema ist "Blossom like a Butterfly". Ich liebe diesen Schmetterlingstempel. Er ist mein absoluter Favourit. Den Text vom Stempelset habe ich mit goldenem pulver embossed. Der Schmetterling ist mit Distress Inks koloiert.
The base is a banner from the DCWV DIY 6" x 8" Banner Project Stack. I covered it with a thin layer of gesso. My top layer is a banner cut out of a gelli print which was designed with the gorgeous new large stencil "Leaf Bliss stencil" from ARTplorations. On top I added some texture with black gesso and the "Honeycomb Delight" stencil. My theme is "Blossom like a Butterfly"! I love this butterfly stamp so much! It's my favourite butterfly stamp! I embossed the sentiment from the set with gold powder. The butterfly is colored with Distress Ink.
xx Susanne.
Products from ARTplorations and STAMPlorations:
Leaf Bliss stencil, Blossom like a Butterfly, Honeycomb Delight
Products from DCWV:
DCWV DIY 6" x 8" Banner Project Stack
Saturday, November 21, 2015
The hurrier I go...
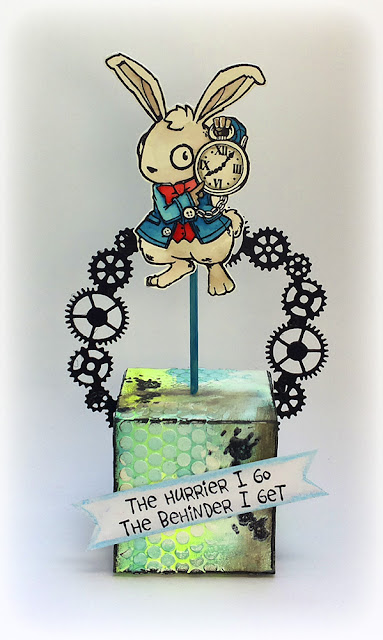
Heute ist wieder mein Tag für Visible Image Stamps. Ich hab einen Artist Trading Block (ATB) mit dem "White Rabbit" Stempelset gewerkelt. Koloriert wurde das Motiv mit Distress Inks (Mermaid Lagoon, Barn Door und Pumice Stone). Der Würfel ist mit der Silhouette Cameo geschnitten und anschließend mit Gesso grundiert. Koloriert hab ich mit den Gelatos (Metallic Mint, Magarita Mix, Chocolate, Black Licorice). Die Struktur kam mit Schablone und Strukturpaste drauf und für etwas mehr Kontrast verwendete ich noch einen Stempel aus dem "Ink Splats" Stempelset von Visible Image. Die Zahnräder sind mit einer Schablone von Noor! Design gestanzt.
It's my day today to share some inspiration with the super unique Visible Image Stamps. I made a Artist Trading Block (ATB) with the awesome "White Rabbit" stamp set. I colored the rabbit with Distress Inks (Mermaid Lagoon, Barn Door and Pumice Stone). I cut the cube with the Silhouette Cameo and primed it with gesso. I inked it with the Gelatos (Metallic Mint, Magarita Mix, Chocolate and Black Licorice). I added some texture with modeling paste and a stencil. I used a stamp from the "Ink Splats" set from Visible Image to add more interest. The gears are cut with a die from Noor! Design.

Ich hoffe mein ATB gefällt Euch. Bis bald, Susanne.
I hope you like my ATB. See you all soon! Susanne.
Stamps from Visible Image:
White Rabbit
Ink Splats
It's my day today to share some inspiration with the super unique Visible Image Stamps. I made a Artist Trading Block (ATB) with the awesome "White Rabbit" stamp set. I colored the rabbit with Distress Inks (Mermaid Lagoon, Barn Door and Pumice Stone). I cut the cube with the Silhouette Cameo and primed it with gesso. I inked it with the Gelatos (Metallic Mint, Magarita Mix, Chocolate and Black Licorice). I added some texture with modeling paste and a stencil. I used a stamp from the "Ink Splats" set from Visible Image to add more interest. The gears are cut with a die from Noor! Design.
Ich hoffe mein ATB gefällt Euch. Bis bald, Susanne.
I hope you like my ATB. See you all soon! Susanne.
Stamps from Visible Image:
White Rabbit
Ink Splats
Friday, November 20, 2015
Pumpkin Paperclips and Die-Namites Blog Hop
Herzlich Willkommen zum monatlichen Blog Hop von Die-Namites Dies.
Der Hop started jeden dritten Freitag im Monat und wir zeigen Euch an
diesem Tag immer einen besonderen Trick oder eine Idee, was man mit den
wunderschönen Stanzschablonen von Die-Namites alles anstellen kann.
Außerdem verlosen wir zwei Einkaufsguscheine für den Die-Namites Online
Store im Wert von 10$.
Hello and welcome to the monthly Die-Namites Dies Blog Hop! The Blog Hop is on every third Friday of the month and each of us shares a fun tip or technique. We love to hear what others are doing and how they are saving time and getting the best use from their die cuts. So here we go, start the hop with us and two random persons will win a $10 dollars DieNamites Gift Cards to buy in our store.
Springt von Blog zu Blog und hinterlasst einen Kommentar bei jedem Design Team Mitglied und zum Schluss natürlich auch auf dem Die-Namites Blog. Zwei Personen werden aus den Kommentaren gezogen! Wenn Ihr von Martha Lucia's Blog kommt, dann seit Ihr auf dem richtigen Weg. Andernfalls hilft Euch die unten stehende Liste:
Be sure to hop around and comment on each design team members blogs.Two random person will be chosen from the comments and likes to win the gifts certificates. What fun and there is lots to see and learn. If you come over from Martha Lucia's blog you are on the right way! If not you better check our line up:
DieNamites Blog
Marina
Erin
Martha Lucia
Susanne <-- You are here
Freetany
Henryka
Ich möchte Euch heute zeigen, wie ich diese süßen Kürbis-Klammern gemacht habe.
I decided to give you a short tutorial on how I made these lovely pumpking paperclips.
Die kleinen Kürbisse sind mit der Pumpkin Patch Stanzschablone gestanzt. Dazu verwendete ich grünen und orangenen Cardstock. Für etwas mehr Pepp und Struktur verwendete ich Distress Ink Embossing Pulver in den Farben "Peeled Paint" und "Spiced Marmalade".
I used the Pumpkin Patch Die, which was cut a few times out of orange and green cardstock and cut apart. I embossed them with Distress Embossing Powder "Peeled Paint" and "Spiced Marmlade". I glued one orange pumpkin (where I cut of the leaf) to a green one.
Nachdem ich einen orangen Kürbis auf den Grünen geklebt hatte kam die Büroklammer mit Heißkleber an die Reihe. Hier müsst Ihr ein bisschen auf Eure Finger achten.
Now it was time to glue the clip down. I used hot glue. Be careful to to burn your fingers!!!
Die Kürbisklammern sind sooo niedliche und auf Grund der vielen Schichten auch recht stabil.
These clips are too cute and because of the many layers and the embossing very sturdy.
Ich habe einen 15% discount code für Euch für Euren nächsten Einkauf im Die-Namites Dies Online Shop. Gebt susanne15 in das Gutscheinfeld im Warenkorb ein.
I have a 15% discount code for you to use with your next order over at the Die-Namites Dies Online Store. Use susanne15 during the checkout process.
By the way! There are some awesome brand new arrivals in the Die-Namites Die Online Store! Click on the image below to see them all!
Your next stop will be Freetany's Blog! She has a cool tip to share!
Products from Die-Namites:
Pumpkin Patch
Hello and welcome to the monthly Die-Namites Dies Blog Hop! The Blog Hop is on every third Friday of the month and each of us shares a fun tip or technique. We love to hear what others are doing and how they are saving time and getting the best use from their die cuts. So here we go, start the hop with us and two random persons will win a $10 dollars DieNamites Gift Cards to buy in our store.
Springt von Blog zu Blog und hinterlasst einen Kommentar bei jedem Design Team Mitglied und zum Schluss natürlich auch auf dem Die-Namites Blog. Zwei Personen werden aus den Kommentaren gezogen! Wenn Ihr von Martha Lucia's Blog kommt, dann seit Ihr auf dem richtigen Weg. Andernfalls hilft Euch die unten stehende Liste:
Be sure to hop around and comment on each design team members blogs.Two random person will be chosen from the comments and likes to win the gifts certificates. What fun and there is lots to see and learn. If you come over from Martha Lucia's blog you are on the right way! If not you better check our line up:
DieNamites Blog
Marina
Erin
Martha Lucia
Susanne <-- You are here
Freetany
Henryka
Ich möchte Euch heute zeigen, wie ich diese süßen Kürbis-Klammern gemacht habe.
I decided to give you a short tutorial on how I made these lovely pumpking paperclips.
Pumpkin Patch |
Die kleinen Kürbisse sind mit der Pumpkin Patch Stanzschablone gestanzt. Dazu verwendete ich grünen und orangenen Cardstock. Für etwas mehr Pepp und Struktur verwendete ich Distress Ink Embossing Pulver in den Farben "Peeled Paint" und "Spiced Marmalade".
I used the Pumpkin Patch Die, which was cut a few times out of orange and green cardstock and cut apart. I embossed them with Distress Embossing Powder "Peeled Paint" and "Spiced Marmlade". I glued one orange pumpkin (where I cut of the leaf) to a green one.
Nachdem ich einen orangen Kürbis auf den Grünen geklebt hatte kam die Büroklammer mit Heißkleber an die Reihe. Hier müsst Ihr ein bisschen auf Eure Finger achten.
Now it was time to glue the clip down. I used hot glue. Be careful to to burn your fingers!!!
Die Kürbisklammern sind sooo niedliche und auf Grund der vielen Schichten auch recht stabil.
These clips are too cute and because of the many layers and the embossing very sturdy.
Ich habe einen 15% discount code für Euch für Euren nächsten Einkauf im Die-Namites Dies Online Shop. Gebt susanne15 in das Gutscheinfeld im Warenkorb ein.
I have a 15% discount code for you to use with your next order over at the Die-Namites Dies Online Store. Use susanne15 during the checkout process.
By the way! There are some awesome brand new arrivals in the Die-Namites Die Online Store! Click on the image below to see them all!
Your next stop will be Freetany's Blog! She has a cool tip to share!
Products from Die-Namites:
Pumpkin Patch
Tuesday, November 17, 2015
Christmas Pocket Letter
Ich hab so viel Spaß beim Sestalten von Pocket Lettern. Heute möchte ich ein paar meiner Techniken zeigen. Für dieses Layout verwendete ich die neuen Weihnachtsstempel von Rubber Dance zusammen mit dem Musiknoten Hintergrund und dem "Pines Fir Yew" set sowie dem "Affirmations" set.
I have so much fun creating Pocket Letters and I'd like to share one of my techniques today. I used the new Christmas stamp sets from Rubber Dance together with the "Music Notes", the "Affirmations" set and the "Pines Fir Yew" set.
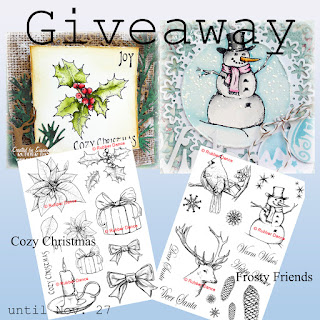
Die Bilder vom "Frosty Friends" und "Cozy Christmas" Set sind Zeichnungen von mir und dazu gibt es ein Giveaway auf meiner Facebookseite:
The images from the "Frosty Friends" and the "Cozy Christmas" set are my drawings and I have a giveaway on my facebook page where you can win your favourite of this sets:
Lasst uns anfangen. I verwendete Aquarellpaper der Größe 10.5" x 7.5" und prägte einige Zweige aus dem "Pine Fir Yew" set mit weißem Embossingpulver.
Let's start! I used a piece of watercolor cardstock that I cut to the size 10.5" by 7.5" and embossed some of the branches from the "Pine Fir Yew" set with white powder.
Der Hintergrund wurde nun mit dem Marabu Art Spray koloriert. Ich finde diese Sprühfarben toll, da sie nach dem Trocknen wasserfest sind.
I colored the background with the Marabu Art Spray. I really like these sprays, because they are waterproof when they are dry.
Mit Distress Ink "Walnut Stain" kamen einige Tropfen auf's Papier. Dazu drückte ich das Stempelkissen auf einen Acrylblock, gab etwas Wasser hinzu und ließ die Farbe auf den Hintergrund tropfen.
I used Distress Ink Walnut Stain to add some droplets. I pressed the the ink pad onto an acrylic block, added some water and let the drops fall down.
Schließlich kamen noch einige kleiner Spritzer hinzu und ein wenig Pearlescent Wasserfarbe für etwas Schimmer.
Finally I made some smaller splatters and used a bit of Pearlescent watercolors to make it shimmering.
Ich stempelte einge der Kreis vom "Round in Circles" set, einige Zapfen vom "Frosty Friends" set und die "Music Notes". Für die Kreise verwendete ich Distress Ink "Walnut Stain" und StazOn "Jet Black", wegen des Embossings, für die Zapfen und Musiknoten. Die Seite habe ich in 9 Karten geteilt bevor ich stempelte. Einfacher wäre es umgekehrt gewesen!
Mit Gesso und Distress Glitter "Clear Rock Candy" gab ich den Kanten der Karten einen frostigen Look.
I stamped some circles from the "Round in Circles" set, some of the cones from the "Frosty Friends" set and the "Music Notes". I used Distress Ink "Walnut Stain" for the Circles and StazOn "Jet Black" (because of the embossing) for the cones and the music notes. I cut my page into 9 pieces before I added those stamps. It would have been easier to stamp first and then cut!!!
I used gesso together with Distress Glitter "Clear Rock Candy" on some of the edges of every single card to get a frosty look.
Es kamen noch ein paar Verzierungen hinzu und ich konnte die Taschen füllen.
I added the embellishments and filled in the pockets:
Das Haus ist eine Stanze von Marianne Design. Das Doily ist von Cottage Cutz.
The house is a die from Marianne Design. The doily comes from Cottage Cutz.
Stamp sets from Rubber Dance:
Frosty Friends
Cozy Christmas
Music Notes
Pine Fir Yew
Round in Circles
Affirmations
You will get 15% discount on your next order in the Rubber Dance Online Store when you enter "susanne2015" during checkout.
I have so much fun creating Pocket Letters and I'd like to share one of my techniques today. I used the new Christmas stamp sets from Rubber Dance together with the "Music Notes", the "Affirmations" set and the "Pines Fir Yew" set.
Die Bilder vom "Frosty Friends" und "Cozy Christmas" Set sind Zeichnungen von mir und dazu gibt es ein Giveaway auf meiner Facebookseite:
The images from the "Frosty Friends" and the "Cozy Christmas" set are my drawings and I have a giveaway on my facebook page where you can win your favourite of this sets:
Lasst uns anfangen. I verwendete Aquarellpaper der Größe 10.5" x 7.5" und prägte einige Zweige aus dem "Pine Fir Yew" set mit weißem Embossingpulver.
Let's start! I used a piece of watercolor cardstock that I cut to the size 10.5" by 7.5" and embossed some of the branches from the "Pine Fir Yew" set with white powder.
Der Hintergrund wurde nun mit dem Marabu Art Spray koloriert. Ich finde diese Sprühfarben toll, da sie nach dem Trocknen wasserfest sind.
I colored the background with the Marabu Art Spray. I really like these sprays, because they are waterproof when they are dry.
Mit Distress Ink "Walnut Stain" kamen einige Tropfen auf's Papier. Dazu drückte ich das Stempelkissen auf einen Acrylblock, gab etwas Wasser hinzu und ließ die Farbe auf den Hintergrund tropfen.
I used Distress Ink Walnut Stain to add some droplets. I pressed the the ink pad onto an acrylic block, added some water and let the drops fall down.
Schließlich kamen noch einige kleiner Spritzer hinzu und ein wenig Pearlescent Wasserfarbe für etwas Schimmer.
Finally I made some smaller splatters and used a bit of Pearlescent watercolors to make it shimmering.
Ich stempelte einge der Kreis vom "Round in Circles" set, einige Zapfen vom "Frosty Friends" set und die "Music Notes". Für die Kreise verwendete ich Distress Ink "Walnut Stain" und StazOn "Jet Black", wegen des Embossings, für die Zapfen und Musiknoten. Die Seite habe ich in 9 Karten geteilt bevor ich stempelte. Einfacher wäre es umgekehrt gewesen!
Mit Gesso und Distress Glitter "Clear Rock Candy" gab ich den Kanten der Karten einen frostigen Look.
I stamped some circles from the "Round in Circles" set, some of the cones from the "Frosty Friends" set and the "Music Notes". I used Distress Ink "Walnut Stain" for the Circles and StazOn "Jet Black" (because of the embossing) for the cones and the music notes. I cut my page into 9 pieces before I added those stamps. It would have been easier to stamp first and then cut!!!
I used gesso together with Distress Glitter "Clear Rock Candy" on some of the edges of every single card to get a frosty look.
Jetzt war es an der Zeit die Motive vorzubereiten. Coloriert habe ich mit Distress inks und goldenen Pearlescent Wasserfarben. Die Schleife und das Geschenk sind mit goldenem Pulver embossed.
Now it was time to prepare the images that I wanted to add to my pockets. I colored them with Distress Inks and with some of the golden Pearlescent watercolors. The Gift and the bow were embossed with gold powder.
Es kamen noch ein paar Verzierungen hinzu und ich konnte die Taschen füllen.
I added the embellishments and filled in the pockets:
Das Haus ist eine Stanze von Marianne Design. Das Doily ist von Cottage Cutz.
The house is a die from Marianne Design. The doily comes from Cottage Cutz.
Stamp sets from Rubber Dance:
Frosty Friends
Cozy Christmas
Music Notes
Pine Fir Yew
Round in Circles
Affirmations
You will get 15% discount on your next order in the Rubber Dance Online Store when you enter "susanne2015" during checkout.
Subscribe to:
Posts (Atom)